Hi everyone :)
This past week I’ve been working hard to finish my vision board and by Thursday night it was all done! I’m super thrilled with it and yesterday I finally got some photos of the completed board so I wanted to share it with you.
WARNING: Photo heavy post… but for the ‘visual’ people out there (like me LOL) I’m sure you’ll get lots of ideas from it!
Since Monday was an Easter holiday I decided that it was time to put everything else aside and finally work on my vision board. There used to be a beading shop in Rotorua several years ago and when they closed down I bought several printers trays from them at rock bottom prices – actually they were even lower than rock bottom!
I’ve been ‘saving’ the boards to create special projects and this is the first one I’ve used. The spaces in the printers tray were a little smaller than I wanted to the first step was to removed some of them. This board was put together with nails so out came the tools and I got to work!
Step 1: figure out how to take the tray apart
Step 2: remove the back of the tray
Step 3: remove the outer frame
Step 4: start removing slats that I didn’t need and CLEAN the tray!
Step 5: remove rest of slats and then put the tray back together
Step 6: work out the size of each slat and organise the photos into ‘collage sheets’ ready to be cut up! This part alone took several hours!
On Tuesday, which was a NZ school holiday I was able to get my photos actually printed and ready to be cut up.
Step 7: trim photos to size and adhere into spaces
Step 8: sit back and admire first completed section (this lasted about half a minute!) Realise that the photos are sitting back to far and need to be brought forward!
Step 9: remember that I have some foam board left over from another project that would be perfect for this job and begin to cut foam board to size
Step 10: realise that I will need to do each gap TWICE because two pieces of foam put together works better than one piece by itself!
Step 11: notice that the printers tray is looking a little bit dull compared to when I was cleaning it and then go and look for the Danish Oil in the garage… this took quite a while too! Decide that ‘well ventilated’ simply means ‘leave the back door open’ and proceed to oil the entire printers tray!
Step 12: Mikayla comes home to ask “What’s that smell?” and realise that leaving the back door open probably doesn’t qualify as ‘well ventilated’ but proceed to finish off the oiling anyway!
Step 13: Spend the next couple of evenings trimming and cutting foam board and photos until project is finished!
p.s. it is mandatory during this process to stop and admire your work regularly and to feel the need to tell ‘uninterested’ 18 year old about every little detail as you do this! LOL
The finished board
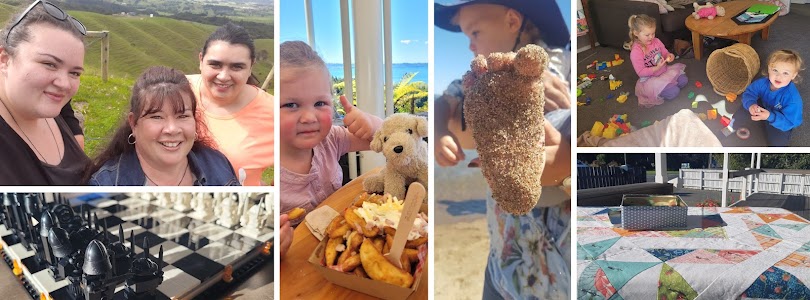
Left side:

Middle section:

Right section:

The full board:
I also wanted to include the process in my One Little Word album so here’s what I came up with for that:
One of the bonuses of using the foam board in the tray is that it actually fits really well so I didn’t need to adhere it into the tray at all. The photos are adhered to the foam board. I’ve worked out a way to remove the foam board from the printers tray relatively easily so now I’ll be able to change the photos whenever I want to!
Now that I’ve used one of my printers trays I’ve come up with loads of ideas for the others so I’m sure you’ll see them feature here at some point.
Thanks for visiting and I’d love to hear what you think of this project :) xx
Wowza! Bloody awesome Shell,you clever girl! love your writing style too! xoxo
ReplyDeleteOh wow - now aren't you the clever one. Love those printer trays. :)
ReplyDeleteThis is the most interesting way of displaying a vision board I have ever seen.
ReplyDelete